Docker has become omnipresent in recent years. However, by default, it requires root privileges to run containers. Obviously, this is not good security-wise. But a simple change will allow you to run docker container as a regular user. In the examples below, I am using Ubuntu 17.04, but the commands should be the same for any Linux distribution.
Add user to docker group
First of all, what happens if you try to run docker without sufficient privileges? You can see the output below:
$ docker run hello-world
docker: Got permission denied while trying to connect to the Docker daemon
socket at unix:///var/run/docker.sock: Post https://%2Fvar%2Frun%2Fdocker.sock/v1.28/containers/create: dial unix /var/run/docker.sock: connect: permission denied.
See 'docker run --help'.
Docker allows users in docker group to run containers. You can check which users the group contains by running:
$ cat /etc/group | grep docker docker:x:140:
In the example above, the group does not include any users. Therefore, you need root privileges to run containers, as shown by the error above. This is the default setting. To add your user to the docker group, run this command:
sudo usermod -a -G docker user
Read more…
Managing Vim plugins can quickly get messy. Fortunately, there are several solutions to this problem. My favorite one is Pathogen by Tim Pope. It makes it easy to install plugins in their own private directories and automatically load them. And combining it with Git will make your Vim configuration easily portable across computers.
Install Pathogen
So how do we set it up? First of all, prepare a Git repository for your Vim plugins:
$ git init .vim
$ mkdir .vim/bundle
Next, get Pathogen. To makes things easier, we will add it as Git submodule:
$ git submodule add https://github.com/tpope/vim-pathogen bundle/pathogen
$ ln -s autoload bundle/pathogen/autoload
Furthermore, to enable Pathogen, you must add the following lines to your .vimrc:
execute pathogen#infect() syntax on filetype plugin indent on
Managing Vim plugins
Now you can happily start adding other plugins as submodules. Here is an example using Vim Sensible:
$ git submodule add https://github.com/tpope/vim-sensible bundle/vim-sensible
In order to update them later, just run:
$ git submodule update --remote --merge
Finally, if you ever need to delete them later, follow these steps:
$ git submodule init bundle/vim-sensible
$ git rm bundle/vim-sensible
$ rm -Rf .git/modules/bundle/vim-airline
$ git commit
Synchronize everything
Just one thing is missing to make the setup perfect. Ideally, your vimrc would be stored along with the plugins. I prefer dotfiles for the job. For it is simple and ready to install using pip. So let’s do that:
$ sudo pip install dotfiles
Then create a folder for your Vim configuration (which you can use for other configurations as well):
Finally, add the Vim configuration files:
$ dotfiles --add ~/.vimrc
$ dotfiles --add ~/.vim
Voilà. At last, you can keep the changes to your Vim settings and plugins safely versioned now. And to set them up on a new computer, you just need to clone the repository, install dotfiles and run:
Can’t get easier than that. Now, head over to see some of my Vim tips.
I’ve been thinking about switching to a rolling distribution on my working machine for quite some time. Because the packages in Ubuntu repositories are just too outdated for my needs and I want to save myself the headache of PPAs. And when Ubuntu announced dropping Unity in favor of Gnome, my mind was made up. I would use a rolling distro on my main computer and Ubuntu 16.04 elsewhere.
Unify package installation
In the end, I decided to go for OpenSuse. Since I use an Ansible playbook to setup my machines, it would take no time to have it up an running. Or so I thought. However, there was a little caveat. As my playbook used the apt module to install software, it would obviously not run on OpenSuse. Luckily, since the version 2.0, Ansible provides a platform-agnostic package manager module. It is called simply package. As a result, installing packages across different distributions is as easy as running:
---
- name: Install packages
  become: yes
  package:
    name: git
    state: present
Or is it? While it may work in the case of Git, not all packages have a same name in different Linux distributions. So you have to set up variables for those: First of all, defaults in vars/default.yml:
Then, for Debian family vars/Debian.yml
---
apache_package: apache2
And for Redhat family vars/Redhat.yml
---
apache_package: httpd
Afterwards, just include them in your tasks:
 - include_vars: "{{ item }}"
   with_first_found:
     - "{{ ansible_os_family }}.yml"
     - "default.yml"

 - name: Install Apache
   become: yes
   package: name: "{{ apache_package }}"
   state: present
Read more…
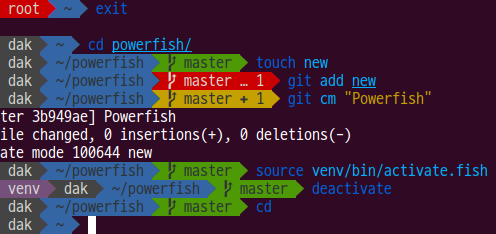
I dedicated couple evenings to Powerfish lately, resulting in a host of new features. If you don’t know what I’m talking about, Powerfish is an elegant and informative prompt for the Fish shell inspired by Powerline. Without further ado, let’s see what is new.
New features
First of all, Powerfish now fully supports the Vi keybindings. So there is no ugly box showing the current mode at the beginning of the prompt anymore. A small change, but definitely visible, if you use the Vi mode, like me. There are also two new flags in the prompt. One displays the number of background jobs, and another one shows if the last command failed. The Git flags were overhauled as well. Now they show number of untracked, modified, staged, stashed and conflicting files. If you don’t care about the concrete numbers, there is an option to display only the flags.
Read more…
SSH, while an indispensable tool, is starting to show its age in certain situations. We have all experienced the lag when using cell phone tethering or finding your remote connections hanging in limbo when resuming your laptop from sleep. No wonder - the first release of SSH came out over twenty years ago and the landscape was very different back then. It was an age of desktop workstations and cable networks. When SSH was designed, nobody thought people would be working on laptops, switching between wifis and mobile connections. Mosh - short for mobile shell - aims at those users. It uses state machines on both client and server and only communicates the changes between them, lowering bandwith use and decreasing latency. It uses SSH for authetification, which greatly simplifies its setup. Once the connection is established, it communicates through encrypted UDP datagrams, which makes it more resilient to IP address changes and connection dropouts. As you can see, it is a handy tool to have when you are on the go. So how to get it running?
Install
Mosh needs to be installed on both the server and the client. In most package managers, the package is called simply mosh. For example, on Debian and Ubuntu derived systems, you can install it with:
Read more…
You have Raspberry Pi set up and running, but typing password every time you try to login using ssh is quite the pain. Well, using key-based authentication is not only more convenient, but also more secure. Let’s see how to set it up.
Set up password-less SSH
First of all, you need to generate the public / private key for your computer using this command:
$ ssh-keygen -t rsa -b 4096
You will be asked for a pass-phrase. Using one is highly recommended. You should use one that is long, preferably a whole sentence, and different from your password. Avoid using famous quotes, as your pass-phrase could easily get cracked by a dictionary attack. Next, upload the key to your Pi:
$ ssh-copy-id -i ~/.ssh/id_rsa.pub pi@raspberrypi.local
If it failed to connect, just use the Pi’s ip adress in place of rapsberrypi.local. You should now be able to connect to your pi using the key.
Read more…
Say, you might have finished configuring your Raspberry Pi. It is running smoothly, but there one thing that gets on your nerves. The pesky ethernet cable is getting in your way. Well, it’s time to get rid of it for good and setup the wifi. To do that, you need to edit the following two files: /etc/network/interfaces and /etc/wpa_supplicant/wpa_supplicant.conf.
Configure the wireless
Let’s start with the network intefaces. Open the first file in text editor:
$ sudo nano /etc/network/interfaces
Go to the wlan0 section, which stands for you wifi adapter, and edit it so it looks like this:
allow-hotplug wlan0
iface wlan0 inet dhcp
  wpa-conf /etc/wpa_supplicant/wpa_supplicant.conf
iface default inet dhcp
In case your /etc/network/interfaces does not include a wlan0 section, just copy the whole thing. When you are done, press ctrl + x to save the changes.
Read more…
Rapsberry Pi is the single most popular computer in the world. And it is easily one of the most hacked systems as well. That’s due to single fact - most users never change the default username and password. But is a relatively a simple process, so there is no reason not to do it. If you already have your Raspberry Pi up and running, you can get going.
Read more…
Please, all welcome Powerfish, the one true Fish prompt to rule them all. I know what you might be thinking: “Custom shell prompts? I am not that much of a geek.” I was like that too. But then I thought, what if instead of just taking up space, the prompt could show me the information I need? Powerfish does just that and looks good too. No more wasting time typing ‘git status’, having to amend commits and similar annoyances. But enough words, just see it in action:
You might have noticed similarities with Powerline. And you would be right. When I was looking for a nice Fish prompt (to no avail), Powerline inspired me to write one instead. To get Powerfish, just head over to the project Gitlab page. Not using Fish shell yet? No need to worry, check out why it’s so awesome and go install it.
The other day, I stumbled upon an interesting talk by Maciej Cegłowski about the worrying trend of website obesity. I have to say, I fully agree with him. As it stands, the situation is getting quite ridiculous. Designers and web coders should stop the unnecessary bloat. Here’s the transcript of the talk:
Website Obesity